wooldancer: "original handSPUN
: knit design & creation :
featuring luxe organic wool & silks
handmade in Australia
Neckwear collection
s k e t c h : textile jewellery
check out our NEW online store at bluecaravan
"
Tuesday, April 12, 2011
Wednesday, January 09, 2008
Art Yarn Workshop Announcement
The date has been set, so I'm on a roll writing a fun-filled workshop plan - & what a fun-fiber-filled day we'll be having! I'm excited, and a little nervous - it has happened so fast really, but without further ado here are the details:
 Wild & Whimsical Art Yarns Workshop with Wooldancer!
Wild & Whimsical Art Yarns Workshop with Wooldancer!Sat 9th Feb 2008
9.30 - 4pm POA
NSW Spinning & Weaving Guild
St Paul's Church, Burwood Rd,
Burwood, Sydney.
9.30 - 4pm POA
NSW Spinning & Weaving Guild
St Paul's Church, Burwood Rd,
Burwood, Sydney.
We will explore contemporary art yarn techniques, with a focus on core-spinning supercoil yarns, plying beehives, splicing fabric strips & sequins, creative play with nubs, add-in's (whole cocoons, felt beads/shapes) & more. We will discuss uses for Art Yarns and yarn composition, which will be practiced throughout the day.
It is advised you have a knowledge of spinning & a zest for creative yarn making! It is also helpful if you have a large flyer & bobbins, but don't worry if you don't, okay!
A party bag of fibers will be supplied, and please bring some of your own aswell. Further details & notes on what to bring are available upon registration.
Please email me if you are interested in attending: wooldancer at gmail dot com.
There may be a follow-on workshop on Drum Carding & prepping fibers for making Art Yarns. Let me know if you would be interested in this too *-* Further ongoing 'Spin Circle' workshops will be starting in the Blue Mountains in 2008, so drop me a line if you would like to know more about these. I'm looking forward to spinning it up with you!
There may be a follow-on workshop on Drum Carding & prepping fibers for making Art Yarns. Let me know if you would be interested in this too *-* Further ongoing 'Spin Circle' workshops will be starting in the Blue Mountains in 2008, so drop me a line if you would like to know more about these. I'm looking forward to spinning it up with you!
Monday, September 17, 2007
Enviro Fest Stall - Sat 22nd Sept

I am thrilled to be attending the Korowal EnviroFest this weekend.. this will be my first actual proper market stall, so I am a little nervous, slightly crazy about having enough stock prepped, and totally excited to be able to just BE there to spin up some eco-fibers!!
I'll be taking along some Felting & Spinning Batts,
handdyed Soy silk & Bamboo rovings,
a few handdyed yarns, and a colourful cackle of Handspun Art Yarn,
aswell as some Children's Felt Balls, Needle felting books including 'From Factory to Fantasy' by the most splendid Goddess of Needlefelting Ayala Talpai,
I also have a few copies of Pluckyfluff's 'Handspun Revolution',
and some handknitted scarves on a special end-of-season sale
- all hanging out with me & my trusty Ashford Traveller.
It is entirely possible that i will be scrambling it all together last minute considering I have the twinsies by my side.. but children makethe prep all the more interesting,right!!
I think we'll be learning how to pack cello bags with colourful wool-fluff for our morning craft activities this week.. Imi is already fairly adept at making treasure beads from the fluff that mysteriously finds its way into the toy stash ~ & she is currently spashing in the rinse buckets with her water-buddy Maz.
If you are in the Blue Mountains this coming weekend, come along for a look-see.. There will be heaps of local businesses to check out, from sustainable lifestyle, healing sessions, childrens workshops, some fantastic local handmade products & more more more!!
Hopefully I'll see you there *-*
Friday, December 22, 2006
more to come...
the workshop has been rather quiet of late, mothering 2yearold twins means there is lots of dust gathering on the studio floor! However, I have some exciting patterns, projects & tips to work on during the Holidays, & will return Fresh & Fuzzy in the New Year.
Christmas Cheer to You, *-* Wooldancer!
Christmas Cheer to You, *-* Wooldancer!
Tuesday, September 12, 2006
TUTORIAL: Dyeing Yarn with Food-Colours
 :: Non-toxic wool dye Tutorial with Wooldancer! ::
 With this tutorial you will discover the fabulous & colourful world of non-toxic dyeing in the Kitchen: even your 3year-old can join in! A perfect activity to do with children, dyeing with food-colouring is a fun rainy-day activity. So, why not grab some yarn & create colour with your kids - it's truly a ball of fun! har

- examples of yarn dyed with food colours by my 4year-old!
If you don't have professional acid dyes on hand, the good news is you can use a few simple ingredients from your Kitchen & still achieve vibrant, colour-fast results!
In fact, if you are starting out with fiber-dyeing food-colouring will give you truly rich, exciting, & light-fast colours to play with, & can be used to dye a range of fiber types: wool, silk, synthetic nylon, & soysilk fibres.
Note: Food-colours will not dye cotton or other plant-based fibres with the same vibrancy or light-fast results.
Herein lies the proceedure for your dyeing pleasure!
The following instructions are for MICROWAVE DYEING, or use SOLAR heat in the boot of your car!
The BASIC Process is to colour your fiber with food-colouring. Vinegar is an acid fixative. To ensure colourfastness the dye is set into the fiber with heat using either a microwave or steam on a stovetop.
STEP 1: GATHER your ingredients ..

Fortunately everything you need will most likely be in your kitchen:
- Liquid Food Colours : we use Queen brand
- white vinegar
- wool detergent
- plastic gloves - food-colours will stain
- a large bowl for soaking
- small glass or plastic jars for preparing the dye
- HEATSOURCE: microwave / car boot + hot sunny day.
- microwave safe bowl / plastic wrap / garbage bags
- 250ml measuring cup
- turkey baster, sauce bottle, medicine dropper for applying dye
- yarn / roving / washed fleece / anything woolly really!
STEP 2: PRE-SOAK your fibre..
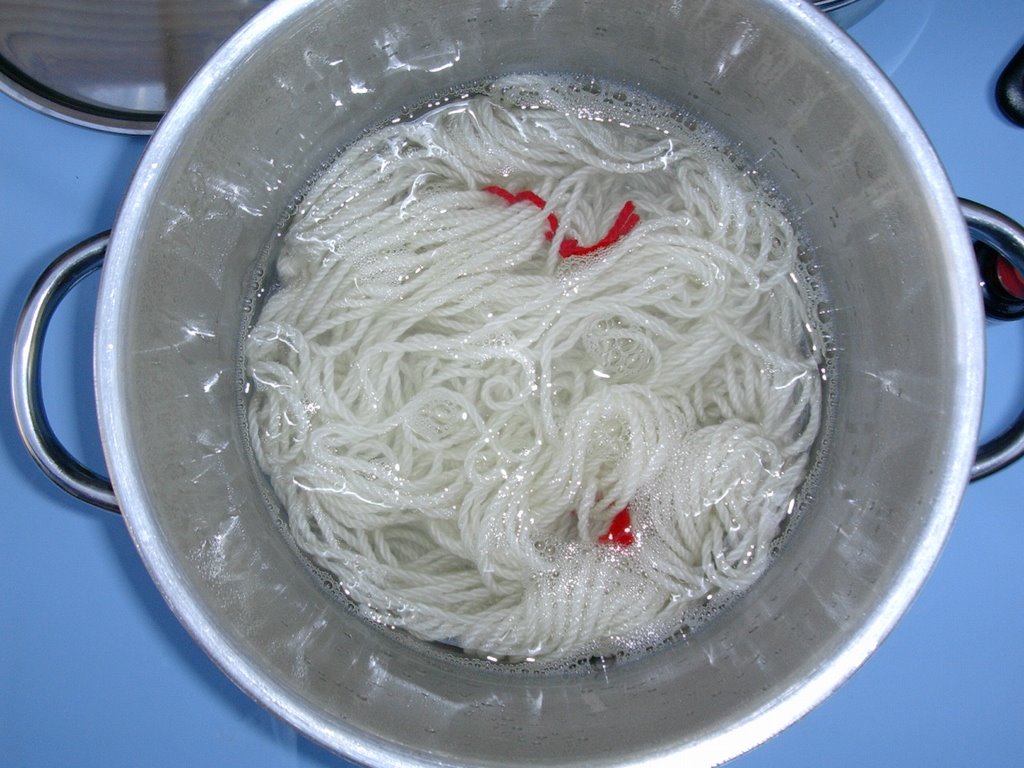
- Place a tiny dash of wool detergent into vessel of choice (the detergent helps the fiber take up the vinegar)- I use a saucepan which helps retain heat during pre-soaking, but a large salad bowl would be fine;
- Pour lukewarm tap water into vessel, enough to cover fleece plus a little extra for swelling;
- Add a glug of vinegar to the water (1 glug = approximately 1/4cup/60mls/3fl.oz's).
- Slowly push all the fiber into the water, gently submerging until all the little air bubbles dissappear. Be sure not to agitate the fiber at this point, it can felt.
- 4. Soak for about 1/2 an hour'ish.
- 4. Gently squeeze water from fleece, being careful not to rub the fiber.
- 5. Place fiber onto plastic wrap/garbage bag, or into a large microwave safe bowl. I split the garbage bag in half when dyeing quantities of 100gr or more. Ensure there is enough overhang to wrap up your fiber parcel tightly.
HINTS FOR MAKING UP THE DYE-COLOURS:
- make up the dye: Mix food colouring + water + vinegar. A good guide ratio is 1 cup / 250mls fluid dye-colour per 100gr/4oz fiber. When using multiple colours, evenly distribute 250mls water between the colours.
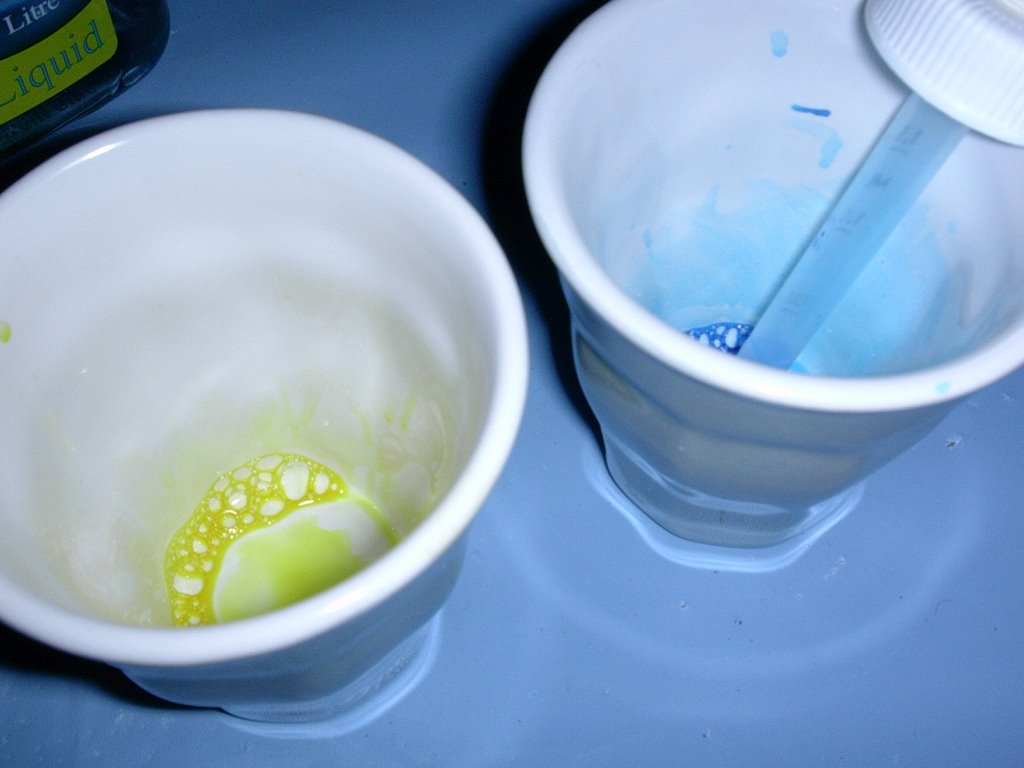
TO MIX UP DYE:
- Put 20mls / 2teaspoons food colour into small jars, one jar per colour.
- Mix tap water & vinegar to a ratio of 4:1 [ 200mls H2o : 50mls vinegar per 100grams/4oz yarn]
- Pour some of the H2O mix into the colour jars - evenly distributing though each colour.
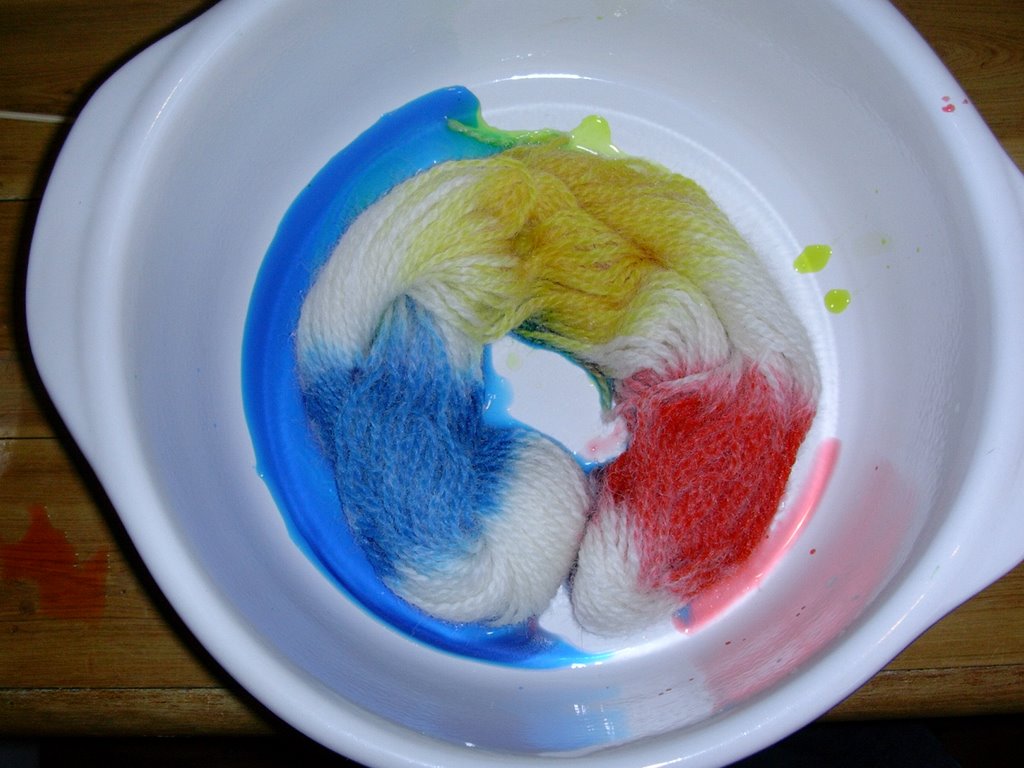
PAINT, POUR, PAT, POKE, APPLY DYE:
- Apply the dye to the fiber using any of the above applicators by pushing the colour into the yarn, ensuring you get into the middle & underside.
- If using roving or fleece, I like to pour the colour on to the fiber & gently push the colour into the fiber with my gloved hand. Keep the fiber steady, there should be no need to move the fiber around as you do this. Children love to use droppers to apply dye!
- Wrap the sides of the plastic over the fiber, making a tight package. Fold the package in half or thirds, or roll up if using plastic wrap.
- If using a microwave safe bowl, cover your bowl with plastic wrap & stab in a few small air holes with a skewer
- If SOLAR CAR BOOT heating: cover bowl with tight lid.
SECRET TIP: to work out how long you need to heat your fibre in the microwave, place 1 cup of water into the microwave & heat to boiling. Take note of the time it takes to bring the cup of water to boil. This is how long you need to heat your fibre. If you used more than 100gr wool / 1cup dye liquor, then increase the time to match your quantities.
- Place in Microwave for half time; let rest for a few minutes; repeat until boiling temp reached & liquid goes clear - usually 8-10MINUTES in total, depending on the wattage of your microwave.
- :: do not overcook as fibre will burn if too dry ::
- ****Caution : steam can burn ****
- Take out of microwave, allow to rest on the bench until fiber has cooled.
STEP 5: RINSE the fiber..
- Fill sink with water (same temperature as the fiber)
- Place cool yarn into sink to rinse. Do not agitate.
- Soak the fiber for a minimum of 15minutes;
- Repeat Rinse Bath until water is clear.
- Gently squeeze fibre, & hang to dry in the sun & fresh air over a coathanger (the wooden ones are great), or on a bamboo hook or a handy tree branch.
STEP 6: HAVE A CUPPA! & congratulate yourself for bringing more colour into the world!
voi la!! Yes handdying is addictive YAY!!
Tuesday, August 29, 2006
Welcome to the Workshop!
Stay tuned as the Wooldancer Fiber Workshop is still under construction!
As cushy as curling up on your couch under granny's crochet blankie, we hope the wooldancer workshop will be a warm & fuzzy place to visit.
As cushy as curling up on your couch under granny's crochet blankie, we hope the wooldancer workshop will be a warm & fuzzy place to visit.
Subscribe to:
Posts (Atom)